Anyone doing Windows programming must have done some event handling in some way or another: capturing the double-click of a button, handling the click of a menu item, reacting to the moving of the mouse pointer over a label, and so forth. But what about creating your own event, in your own control, and letting others capture that event? In this article, you will learn how to use the observer design pattern to raise and handle events for your .NET control and learn how to pass event argument data.
An event is a message sent by an object to notify other objects that an action has occurred. The action could be user-initiated, such as a mouse click, or it could be triggered by some other program logic. The object that raises the event is called the event sender, and the object that receives the event notification is called the event receiver. The event receiver has a method that gets executed automatically in response to the event.
The .NET Framework supports easy event-driven Windows programming. It's so easy that often the programmer does not have to know how events work in the underlying .NET technology. All one has to remember is this: if you are interested in receiving an event from a Windows control, you provide an event handler and register the event handler with the event source. This is called event wiring. In C#, you need to write a line of code of the following syntax, normally in the class' constructor of your form.
eventSource.someEvent += new SomeEventHandler(someMethod);
For instance, if you want to handle the Click event of a button named button1, and you want the private button1_Click method to be executed when the Click event occurs, you write the following.
button1.Click += new EventHandler(button1_Clicked);
Then, you must also provide the implementation of button1_Click in your class, as follows.
private void button1_Clicked(Object sender, EventArgs e)
{
  // code to be executed when the Click event occurs
}
The method does not have to be private, but it must accept two arguments: an object of type Object and an EventArgs
object. So consuming events is a piece of cake. Now, let's have a look
at creating your own custom event that other programmers can use.
Before we do this, however, we should first discuss the observer
pattern in object-oriented programming.
There are two key objects in this pattern: the subject and the observer. The subject may have one or many observers. These observers listen for notification from the subject of a state change inside the subject. This pattern is also known asdependence or publish-subscribe. According to The Gang of Four (Erich Gamma, Richard Helm, Ralph Johnson and John Vlissides) in their book Design Patterns: Elements of Reusable Object-Oriented Software, the Observer pattern can be applied in the following situations:
|
Related Reading 
|
In event communication, the event sender class does not know which
object or method will receive the events it raises. What is needed is
an intermediary (or pointer-like mechanism) between the source and the
receiver. The .NET Framework defines a special type, Delegate, that provides the functionality of a function pointer.
A delegate is a class that can hold a reference to a method. Unlike other classes, a delegate class has a signature, and it can hold references only to methods that match its signature. A delegate is thus equivalent to a type-safe function pointer, or a callback. The next section describes how to use delegates to communicate an event from an object to another object. The section after that puts the theory into practice by providing a control that has two custom events.
Suppose you want to write a custom event called MyEvent for your custom control named MyControl that extends System.Windows.Forms.UserControl. Here are the steps you need to take.
1. Declare a delegate with the public access modifier. Here I will call this delegate MyEventHandler, and it has two arguments: an object called sender and MyEventArgs called e. We will define MyEventArgs later. Note that the delegate must be declared outside of your control class.
public delegate void MyEventHandler(object sender, MyEventArgs e);
public class MyControl: UserControl
{
   ...
}
2. MyEventArgs in Step 1 is the object that contains the data that can be passed from the event sender (MyControl) to the event receiver. MyEventArgs must extend the System.EventArgs class. Therefore, you now have the following code:
public class MyEventArgs: EventArgs
{
  ...
}

public delegate void MyEventHandler(object sender, MyEventArgs e);

public class MyControl: UserControl
{
   ...
}
There is some implementation you need to write inside the MyEventArgs class, but we will leave it until later.
3. In your control class, declare an event called MyEvent.
public class MyEventArgs: EventArgs
{
  ...
}

public delegate void MyEventHandler(object sender, MyEventArgs e);

public class MyControl: UserControl
{
  public event MyEventHandler MyEvent;
   ...
}
4. In your control class, declare a protected virtual method named On plus the name of the event. Since our event in this example is called MyEvent, the method is called OnMyEvent. Note that OnMyEvent has one argument of type MyEventArgs.
Inside of this method, you raise the event. In C#, raising an event is
achieved by calling the event name. To raise the event, you pass two
arguments: the sender (the control MyControl) and the MyEventArgs object passed to the method.
public class MyEventArgs: EventArgs
{
  ...
}

public delegate void MyEventHandler(object sender, MyEventArgs e);

public class MyControl: UserControl
{
  public event MyEventHandler MyEvent;
  protected virtual void OnMyEvent(MyEventArgs e)
  {
    MyEvent(this, e)
  }
   ...
}
5. Now, the only step left is to actually call OnMyEvent from somewhere in the MyControl
class. How you do this depends on what should cause the event to occur.
This will become clear in the next section, when I present the real
control that implements two events. Afterwards, users of your control
can consume the MyEvent event in your control by wiring
the event to an event handler in their form, as shown at the beginning
of this article. Now, let's see the real code with two events and
demonstrate how these events can be raised and consumed.
|
The following example uses a custom control called WhiteBoard. The WhiteBoard class inherits the System.Windows.Forms.UserControl.
As the name implies, this control acts like a small white board (10
characters x 10 characters) into which the user can type. In addition,
there is a caret that blinks and indicates the current insertion point.
The user can use the arrow keys to move the caret, and hence, the
insertion point. The user can also use control keys, such as Ctrl+R,
Ctrl+G, and Ctrl+B to change the background color of the control, and
Ctrl+Alt+R, Ctrl+Alt+G, and Ctrl+Alt+B to change the text color.
In this article, we will modify the control to add two events:
LineChanged event, triggered when the y coordinate of the caret changes.
ColumnChanged event, triggered when the x coordinate of the caret changes.
We will then capture these two events in a form to dynamically update a label that shows the caret's current position. As an overview, the WhiteBoard control is briefly explained here:
OnPaint method draws the characters into the control's Graphics object, line by line, character by character.
caretThread. This thread is started in the class's constructor and handles the ShowCaret method. The ShowCaret method contains an indefinite loop that make the caret flash on and off every 350 milliseconds.
caretThread is terminated when the control is disposed. We override the Dispose method.
KeyPressed and ProcessDialogKey methods handle the pressing of the keyboard
keys.
CaretX and CaretY (both with a capital C), that can be used to obtain and modify the value of the caretX and caretY
fields, respectively. Notice that the field names start with a lower
case c. All modification of these two fields is done through CaretX and CaretY, for reasons that will become clear later.
Now, let's see how we can add two events to the WhiteBoard control: LineChanged and ColumnChanged. We do so by following the steps in the previous sections.
1. Declare two delegates: LineEventHandler and ColumnEventHandler.
  public delegate void LineEventHandler(Object sender, LineEventArgs e);
  public delegate void ColumnEventHandler(Object sender, ColumnEventArgs e);
2. Define and provide implementations for LineEventArgs and ColumnEventArgs.
public class LineEventArgs: EventArgs
  {
    private int oldValue, newValue;
    public LineEventArgs(int oldValue, int newValue)
    {
      this.oldValue = oldValue;
      this.newValue = newValue;
    }

    public int NewLine
    {
      get
      {
        return newValue;
      }
    }
    public int OldLine
    {
      get
      {
        return oldValue;
      }
    }
  }
  public class ColumnEventArgs: EventArgs
  {

    private int oldValue, newValue;
    public ColumnEventArgs(int oldValue, int newValue)
    {
      this.oldValue = oldValue;
      this.newValue = newValue;
    }

    public int NewColumn
    {
      get
      {
        return newValue;
      }
    }
    public int OldColumn
    {
      get
      {
        return oldValue;
      }
    }
  }
Both classes have a constructor that accepts two integers: the old
value and the new value. Both classes also have read-only properties to
obtain these integers. In LineEventArgs, the properties are OldLine and NewLine. In ColumnEventArgs, the properties are OldColumn and NewColumn.
3. Declare the LineChanged and ColumnChanged events in the control class.
public event LineEventHandler LineChanged;
public event ColumnEventHandler ColumnChanged;
4. In the WhiteBoard class, declare two protected virtual methods for the two events: OnLineChanged and OnColumnChanged. In OnLineChanged, you raise the LineChanged event. In OnColumnChanged, you raise the ColumnChanged event.
    protected virtual void OnLineChanged(LineEventArgs e)
    {
      LineChanged(this, e);
    }
    protected virtual void OnColumnChanged(ColumnEventArgs e)
    {
      ColumnChanged(this, e);
    }
5. Now, call the OnLineChanged and OnColumnChanged methods from inside of the WhiteBoard class. The LineChanged event is triggered when the y coordinate of the caret changes, i.e., when the CaretY property changes value. Similarly, the ColumnChanged event occurs when the CaretX property changes value. Since the caretY and caretX fields are only accessed through the CaretY and CaretX properties, we only raise events from these properties to guarantee that every change in CaretY raises the LineChanged event, and that every time the value of CaretX changes, the ColumnChanged event is triggered.
    public int CaretX
    {
      get
      {
        return caretX;
      }
      set
      {
        int oldValue = caretX;
        caretX = value;
        if (oldValue != caretX)
          OnColumnChanged(new ColumnEventArgs(oldValue, caretX));
      }
    }

    public int CaretY
    {
      get
      {
        return caretY;
      }
      set
      {
        int oldValue = caretY;
        caretY = value;
        if (oldValue != caretY)
          OnLineChanged(new LineEventArgs(oldValue, caretY));
      }
    }
The complete code of the WhiteBoard control, delegates, and event argument classes are given in Listing 1.
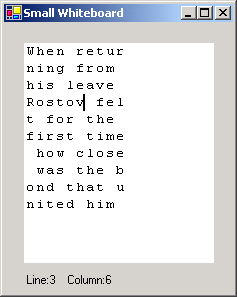
After you compile the WhiteBoard control, you can now use it in a form. An example of such as form is shown in Figure 1. Note there is a label that displays the line and column position of the caret. The text of the label changes every time you move the caret. The code for the form is given in Listing 2.
Figure 1: Consuming the events in a form
Listing 2: Using the custom events in the WhiteBoard control
using System;
using System.Drawing;
using System.Collections;
using System.ComponentModel;
using System.Windows.Forms;
using System.Data;

namespace CustomEvent
{
  public class Form1 : System.Windows.Forms.Form
    {
      private CustomEvent.WhiteBoard whiteBoard;
      private System.ComponentModel.Container components = null;
      private Label label;
      private int column, line;

      public Form1()
      {
        InitializeComponent();
      }

      protected override void Dispose( bool disposing )
      {
        if( disposing )
        {
          if (components != null)
          {
            components.Dispose();
          }
        }
        base.Dispose( disposing );
      }

    private void whiteBoard_ColumnChanged(Object sender, ColumnEventArgs e)
    {
      column = e.NewColumn;
      label.Text = "Line:" + line.ToString() + "    Column:" + column.ToString();
    }
    private void whiteBoard_LineChanged(Object sender, LineEventArgs e)
    {
      line = e.NewLine;
      label.Text = "Line:" + line.ToString() + "    Column:" + column.ToString();
    }
#region Windows Form Designer generated code
      private void InitializeComponent()
      {
        whiteBoard= new WhiteBoard();
        this.SuspendLayout();
        whiteBoard.Location = new Point(20,20);
        whiteBoard.Size = new Size(190, 220);
        whiteBoard.ColumnChanged += new
ColumnEventHandler(whiteBoard_ColumnChanged);
        whiteBoard.LineChanged += new LineEventHandler(whiteBoard_LineChanged);

        label = new Label();
        this.label.Location = new Point(20, 250);
        this.label.Size = new Size(100, 20);

        this.AutoScaleBaseSize = new System.Drawing.Size(5, 13);
        this.ClientSize = new System.Drawing.Size(292, 273);

        this.Controls.AddRange(new System.Windows.Forms.Control[] {whiteBoard, label});
        this.Name = "Form1";
        this.Text = "Small Whiteboard";
        this.ResumeLayout(false);

      }
#endregion

      [STAThread]
      static void Main()
      {
        Application.Run(new Form1());
      }
    }
  }
Budi Kurniawan is an IT consultant specializing in Internet and object-oriented programming, and has taught both Microsoft and Java technologies.
Return to the .NET DevCenter.
Copyright © 2004 O'Reilly Media, Inc.